Beading
Technique to Make Bead Animals
The
main beading technique here is the 'Back and Forth' technique. It's very
simple. Once you mastered it, you'll be able to make most of the bead
animals on my site.
However,
there're a couple of other
needed techniques, what I'll also explain on this page.
You'll
find the step-by-step
instructions for
Back
and Forth
Use
this instruction to make the body of the bead animals. After
you've
finished with the first row, make the second row by doing the same thing again. In
this way, make the rest of the animal.
 |
 |
 |
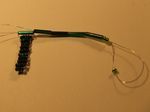
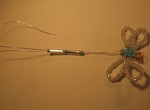
| String
the beads (depending on what you are making) on either side of
the wire. If you're beginning a new bead animal string the bead(s) on
the center of the wire. |
Now,
loop back with the
opposite wire through the beads as shown on the picture above. |
Pull
it as tightly as you can. |
 |
 |
|
If
it's not in the right place (not exactly beside the row before), then
bend it until it looks nice. |
Important:
If
you are making an animal that should be flat, then push the
rows beside each other (and use wire). However, if your animal
supposed to be round
(3D), pull each row very tightly to make them overlap.
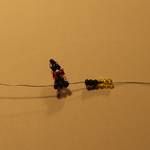
If
it doesn't help, then simply put the rows right opposite of
each other. After that, if you look at your animal from
side, then the rows should look zigzagging as shown on the picture below.
Leg Making
There
are many ways to make a leg for the animals:
- Simple
straight leg
- Leg with
foot
- Leg with
foot and toes
A general tip when
you're making a leg: hold
the leg as near as you can to the body when you pull it tightly.
Simple
straight leg
This
is the most
simple technique to make a legs.
 |
 |
|
| String
the leg beads on one side of the wire. |
Loop back
with the same wire through the leg leaving out the last bead. |
Try
to avoid kinks on the wire. |
TIP:
When
you pull the leg tightly hold the leg as near as possible to the body.
 |
 |
| Hold
the leg to the body as near as you can. |
Pull it
very tightly. Do the same on the other side. |
Leg
with foot
Here
you have the leg with
foot. This is as uncomplicated as the simple leg.
 |
 |
| String
the beads on either wire. For the foot use different color like on the
picture. |
Loop back with the same wire through the
leg (NOT through the foot -- yellow beads). |
TIP:
When
you pull the leg tightly hold the leg as near as possible to the body.
 |
 |
| Pull
it very tightly. If the wire begin to twist set it right. |
Now,
do exactly the same on the other side. |
Leg
with foot and toes
The technique used to make of this type of leg is a bit more complicated than the others. However, after you've both understood and made it once or twice,
it'll become just a routine job. So don't worry... :-)
You'll make
this leg a bit
differently than the other two. The main difference is
that you don't string each 'leg-bead' on the wire straight away. First,
you string the leg-beads and one
toe beads.
 |
 |
 |
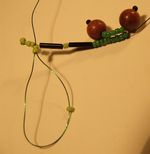
| String
the leg beads (here 3 beads) and one
toe beads on one side of the wire. |
Loop
back through the remaining of the toe beads leaving out the last bead as shown. |
Hold the
toe near to the leg and pull it tightly. |
 |
 |
 |
| Now,
you've finished the first toe. |
String the second
toe beads on the same wire. |
Loop back through the toe beads leaving out the first bead as before. |
 |
 |
 |
| Hold
the toe near to the leg and pull it tightly. |
Do
exactly the same with all toes. (Here 3 toes) |
When
you've made all of toes, loop back through
the whole leg. |
 |
 |
| Pull
it tightly. Do exactly the same on the other side. |
Congratulations!
now, you've finished your first leg with toes. |
Wing making
I'll
introduce you to the basics of wing making. This is as plain as
the simple straight leg.
 |
 |
| String
all wing beads on either side of the wire. |
Loop
back through only the first bead (the
nearest to the body) as shown. |
 |
 |
| Hold
the first bead near to the body as you pull it tightly. |
Do
exactly the same on the other side. |
Tail making
Use
this technique to make the tail of an animal or the abdomen of
an insect.
 |
 |
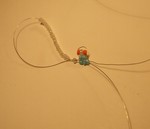
| String
the tail beads on both wire. |
Pull it beside the body, tightly. |
Finishing:
Now
you need to make a knot on the end of the tail, otherwise the beads
will fall off.
 |
 |
| Loop
back with either wire through and around the last bead. |
Pull it very tightly and clip the
end of the wires. |
Find more about beading:


